Table of contents
- 🌟 Introduction
- 🔧 What are Lightroom Presets?
- ✨ Benefits of Using Lightroom Presets
- 📂 Types of Lightroom Presets
- ⚙️ How to Install Lightroom Presets
- 🎯 How to Use Lightroom Presets Effectively
- 🛠️ Creating Your Own Lightroom Presets
- 🌟 Popular Lightroom Preset Packs
- ⚠️ Common Mistakes to Avoid When Using Presets
- 🎉 Conclusion
- Ready to Transform Your Photography?
🌟 Introduction
In the world of digital photography, Adobe Lightroom has revolutionized how photographers edit and enhance their images. Among its most powerful features are Lightroom presets – pre-configured editing settings that can transform your photos with just a single click. These magical tools have become indispensable for photographers of all skill levels, from weekend enthusiasts to professional artists.
Lightroom presets are essentially saved combinations of editing adjustments that can be applied to any photograph instantly. Think of them as Instagram filters, but infinitely more sophisticated and customizable. They can adjust exposure, contrast, highlights, shadows, color grading, and dozens of other parameters simultaneously, creating cohesive and professional-looking results.
The significance of presets in modern photo editing cannot be overstated. They've democratized professional-quality editing, allowing photographers to achieve stunning results without years of technical training. Whether you're looking to create a moody cinematic look, enhance natural landscapes, or develop a signature style for your portrait work, presets provide the foundation for consistent, high-quality editing.
In this comprehensive guide, we'll explore everything you need to know about Lightroom presets. From understanding what they are and how they work, to installing them, using them effectively, and even creating your own custom presets. We'll also cover the different types available, popular preset packs worth investing in, and common mistakes to avoid. By the end of this guide, you'll have the knowledge and confidence to transform your photography workflow and elevate your images to new heights.
🔧 What are Lightroom Presets?
At their core, Lightroom presets are saved collections of editing adjustments stored in small files with the extension .xmp or .lrtemplate (depending on your Lightroom version). When you apply a preset to an image, Lightroom automatically adjusts multiple settings simultaneously, recreating the exact look and feel that the preset creator intended.
🔍 Technical Deep Dive
Presets work by storing numerical values for Lightroom's various adjustment panels. When you apply a preset, it's essentially telling Lightroom: "Set the exposure to +0.5, increase the contrast by 25, adjust the highlights to -50, boost the shadows by +30," and so on for potentially dozens of different parameters.
These files are lightweight (typically just a few kilobytes) and contain metadata that Lightroom can interpret and apply to your images. The beauty lies in their non-destructive nature – presets don't actually change your original image files, but rather create a set of instructions for how Lightroom should display and process them.
Common Adjustments Within Presets
📊 Basic Adjustments
- Exposure and brightness
- Contrast and clarity
- Highlights and shadows
- Whites and blacks
- Vibrance and saturation
🎨 Creative Adjustments
- Color grading and toning
- HSL (Hue, Saturation, Luminance)
- Split toning
- Vignetting effects
- Film grain and texture
For example, a "Golden Hour" preset might increase warmth, boost highlights in the orange and yellow ranges, add a subtle vignette, and increase overall saturation to recreate that magical sunset glow. A "Black and White Film" preset might desaturate the image completely, adjust the tone curve to mimic film characteristics, add grain, and fine-tune the luminance of different color channels to create compelling monochrome conversions.
The power of presets lies not just in their ability to quickly transform images, but in their consistency. Once you find a preset that matches your vision, you can apply it across an entire photo series, creating a cohesive look that ties your work together. This consistency is particularly valuable for photographers building a recognizable style or working on projects that require visual continuity.
✨ Benefits of Using Lightroom Presets
Time-Saving Powerhouse
The most immediate benefit of using presets is the dramatic reduction in editing time. What might take 15-20 minutes of manual adjustments can be accomplished in seconds. For photographers processing hundreds of images from a wedding or event, this time savings is invaluable.
Consistent Style
Presets ensure consistency across your entire body of work. Whether you're editing photos from different shoots or lighting conditions, presets help maintain a cohesive aesthetic that becomes part of your signature style.
Creating Specific Moods and Atmospheres
One of the most powerful aspects of presets is their ability to instantly transform the mood and atmosphere of your photographs. A bright, airy preset can make a simple portrait feel fresh and optimistic, while a dark, moody preset can add drama and intensity to the same image. This emotional transformation is what separates good photography from great photography – the ability to evoke feelings and tell stories through visual aesthetics.
💡 Pro Tip for Mood Creation
Consider the story you want to tell before choosing a preset. Warm, high-contrast presets work well for adventure and lifestyle photography, while cool, desaturated presets are perfect for minimalist or architectural work. The preset should enhance your narrative, not distract from it.
Learning Tool for Beginners
For photographers just starting their editing journey, presets serve as excellent educational tools. By applying a preset and then examining the adjustments it made, beginners can understand how different settings affect their images. This reverse-engineering approach helps build intuitive understanding of Lightroom's various panels and controls.
Many beginners feel overwhelmed by Lightroom's extensive array of adjustment options. Presets provide a starting point – a foundation that can be further customized and refined. Instead of staring at a blank canvas, new editors can begin with a professionally crafted look and learn by making incremental adjustments.
Workflow Efficiency
Streamline your editing process
Creative Inspiration
Discover new editing styles
Professional Results
Achieve high-end looks instantly
Perhaps most importantly, presets free up mental energy for the creative aspects of photography. Instead of getting bogged down in technical adjustments, photographers can focus on composition, storytelling, and artistic vision. This shift from technical execution to creative expression often leads to more compelling and emotionally resonant photographs.
📂 Types of Lightroom Presets
The world of Lightroom presets is incredibly diverse, with different categories designed to enhance specific types of photography and achieve particular aesthetic goals. Understanding these categories will help you choose the right presets for your work and develop a more targeted approach to your editing workflow.
👤 Portrait Presets
Portrait presets are specifically designed to enhance human subjects, focusing on skin tones, facial features, and overall flattering aesthetics. These presets typically include subtle skin smoothing, eye enhancement, and color grading that complements various skin tones.
Popular Portrait Styles:
- Bright & Airy
- Film Emulation
- Moody & Dark
- Natural & Clean
- Vintage & Retro
- High Fashion
🏔️ Landscape Presets
Landscape presets are crafted to bring out the natural beauty of outdoor scenes. They often enhance sky drama, boost natural colors, and create depth through strategic contrast adjustments. These presets work particularly well with golden hour and blue hour photography.
Landscape Specializations:
- Dramatic Skies
- Forest & Nature
- Seascape & Ocean
- Mountain & Alpine
- Desert & Arid
- Urban Landscape
💒 Wedding Presets
Wedding presets are designed to handle the unique challenges of wedding photography – mixed lighting conditions, diverse skin tones, and the need for romantic, timeless aesthetics. They often feature warm color grading and soft contrast that flatters both indoor and outdoor wedding scenes.
Wedding Preset Features:
- Romantic Color Grading
- Mixed Light Correction
- Skin Tone Optimization
- Soft, Dreamy Aesthetics
- Timeless Appeal
- Versatile Application
🎬 Cinematic Presets
Cinematic presets draw inspiration from movie color grading techniques, creating dramatic, film-like aesthetics. They often feature specific color combinations like orange and teal, lifted blacks for a film look, and carefully crafted highlight and shadow relationships.
Cinematic Characteristics:
- Orange & Teal Color Schemes
- Lifted Black Levels
- Film Grain Effects
- Dramatic Contrast
- Moody Atmospheres
- Professional Color Grading
🎯 Choosing the Right Preset Category
The key to successful preset use is matching the preset category to your photography style and subject matter. Consider these factors:
- Subject Matter: What are you primarily photographing?
- Lighting Conditions: Indoor, outdoor, natural, or artificial light?
- Desired Mood: Bright and cheerful or dark and moody?
- Brand Consistency: Does it align with your overall aesthetic?
⚙️ How to Install Lightroom Presets
Installing Lightroom presets is a straightforward process, but the exact steps vary slightly depending on your version of Lightroom. Here's a comprehensive guide that covers both Lightroom Classic and Lightroom CC.
📋 Step-by-Step Installation Guide
01Download Your Presets
Download the preset files to your computer. They'll typically come in a .zip file that you'll need to extract.02Open Lightroom
Launch Adobe Lightroom and navigate to the Develop module where you'll be working with your presets.03Access the Presets Panel
In the left panel, locate the "Presets" section. Right-click in this area to bring up the context menu.04Import Presets
Select "Import Presets" from the menu, then navigate to where you saved your downloaded preset files and select them.05Organize Your Presets
Create folders to organize your presets by style, photographer, or project for easy access later.
🚨 Troubleshooting Common Issues
Presets not appearing: Make sure you're in the Develop module and check that the preset files are in the correct format (.xmp or .lrtemplate).
Import option grayed out: Ensure you have an image selected in Lightroom before trying to import presets.
Presets look different than expected: Remember that presets are starting points and may need adjustment based on your specific image's lighting and exposure.
✅ Best Practices
- Create organized folder structures
- Test presets on various image types
- Keep backup copies of your presets
- Regularly clean up unused presets
⚠️ Important Notes
- Presets work differently on different images
- Always shoot in RAW for best results
- Consider your monitor calibration
- Update Lightroom for compatibility
🎯 How to Use Lightroom Presets Effectively
While presets can instantly transform your images, using them effectively requires understanding that they're starting points, not final destinations. The most successful photographers use presets as foundations, then make targeted adjustments to perfect their images.
🎨 The Art of Preset Application
Think of presets like a painter's underpainting – they establish the overall mood and color palette, but the masterpiece comes from the refinements and personal touches you add afterward. The key is to view presets as collaborative tools that work with your creative vision, not replace it.
Essential Tips for Preset Application
🔧 Technical Adjustments
- Exposure First: Correct basic exposure before applying presets
- White Balance: Set proper white balance for accurate color rendering
- Crop and Straighten: Handle composition issues before stylistic edits
- Lens Corrections: Apply lens corrections for optimal results
🎨 Creative Refinements
- Intensity Control: Reduce preset opacity if the effect is too strong
- Selective Adjustments: Use masking tools for targeted corrections
- Color Fine-tuning: Adjust individual color channels as needed
- Local Adjustments: Enhance specific areas with brushes or gradients
Before and After: Preset Transformation Examples
📸 Portrait Example: "Golden Hour Glow"


Adjustments made: Applied "Golden Hour" preset, then reduced highlights by -30, increased shadows by +20, and added subtle skin smoothing with the adjustment brush.
🏔️ Landscape Example: "Dramatic Sky"
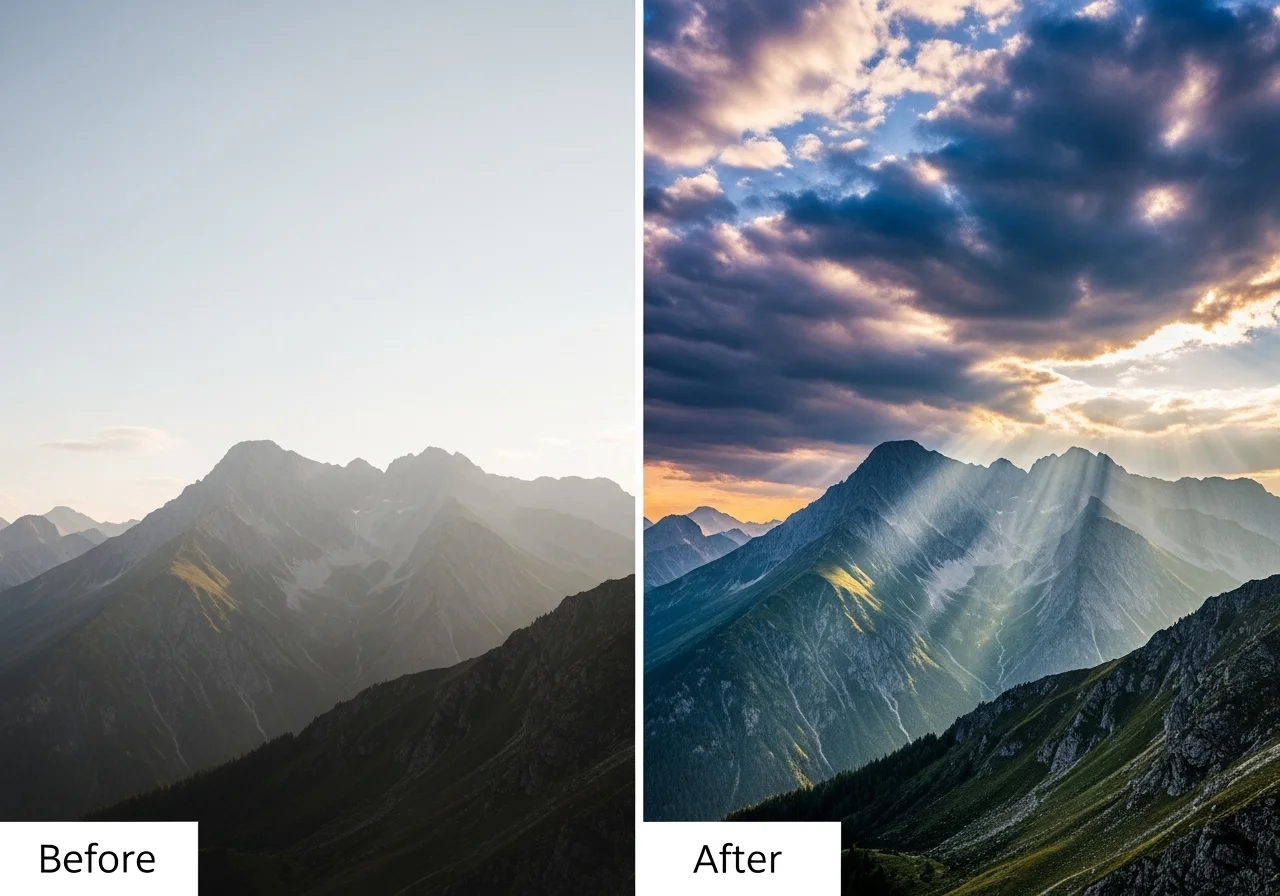

Adjustments made: Applied "Dramatic Landscape" preset, then used graduated filter to enhance sky, increased texture on mountains, and boosted vibrance selectively.
💡 Pro Workflow Tips
Batch Processing
Apply presets to similar images in batches, then make individual adjustments as needed. This maintains consistency while allowing for image-specific refinements.
Preset Stacking
Layer multiple presets for complex looks. Start with a base preset, then apply specialized presets for specific effects like film grain or color grading.
Common Post-Preset Adjustments
Exposure & Contrast
Fine-tune brightness and contrast to match your specific image
Color Balance
Adjust individual color channels for perfect color harmony
Local Adjustments
Use brushes and masks for targeted enhancements
🛠️ Creating Your Own Lightroom Presets
Creating your own presets is where the real magic happens. It's the difference between using someone else's artistic vision and developing your own signature style. Custom presets ensure that your work has a unique, recognizable aesthetic that sets you apart from other photographers.
🎨 The Philosophy of Custom Presets
Your custom presets should reflect your artistic vision and complement the type of photography you create most often. Think about the emotions you want to evoke, the stories you want to tell, and the overall aesthetic that represents your brand as a photographer.
Step-by-Step Preset Creation Guide
01Choose Your Base Image
Select a well-exposed, representative image that showcases the type of photography you want the preset to enhance. This should be your "hero" image that demonstrates the look you're trying to achieve.02Make Your Adjustments
Work through Lightroom's adjustment panels systematically. Start with basic corrections (exposure, highlights, shadows) then move to creative adjustments (color grading, tone curve, effects).03Test on Multiple Images
Apply your adjustments to 5-10 different images with varying lighting conditions and subjects. This helps ensure your preset works well across different scenarios.04Refine and Adjust
Based on your testing, refine the preset settings. You might need to reduce intensity of certain adjustments or modify color grading to work better across different images.05Save Your Preset
In the Presets panel, click the "+" icon and choose "Create Preset." Give it a descriptive name and organize it into an appropriate folder.
Key Considerations for Custom Presets
🎯 Versatility vs. Specificity
Decide whether you want a versatile preset that works on many image types, or a specific preset for particular conditions (like golden hour portraits or moody landscapes).
- Versatile: Subtle adjustments, works broadly
- Specific: Strong character, limited use cases
⚖️ Balance and Restraint
The best presets show restraint. Overly dramatic adjustments might look impressive initially but become tiresome over time and limit the preset's usefulness.
- Subtle is often better than dramatic
- Leave room for individual adjustments
💡 Advanced Preset Creation Tips
Color Grading Strategy: Focus on complementary color relationships. Orange/teal, yellow/purple, and red/cyan are classic combinations that create visual interest.
Tone Curve Mastery: The tone curve is often what gives presets their distinctive character. Experiment with lifted blacks, crushed highlights, and S-curves for different moods.
HSL Fine-tuning: Use the HSL panel to create signature color looks. Slightly desaturating certain colors while boosting others can create a unique aesthetic.
Organizing and Managing Your Custom Presets
Folder Structure
Organize by style, project, or client for easy access
Naming Convention
Use descriptive names that indicate the preset's purpose
Backup Strategy
Export and backup your custom presets regularly
🌟 Popular Lightroom Preset Packs
While creating your own presets is rewarding, investing in professionally crafted preset packs can significantly accelerate your learning and provide inspiration for your own work. Here are some of the most respected and widely-used preset collections in the photography community.
🔥
VSCO Film Presets
VSCO's film emulation presets are legendary in the photography world. They meticulously recreate the look and feel of classic film stocks like Kodak Portra, Fuji, and Ilford.
Best For:
Portrait photography, wedding photography, lifestyle shoots
⭐⭐⭐⭐⭐ (4.8/5)
Premium
🎨
RNI Films
Really Nice Images offers incredibly detailed film emulations with separate presets for different film processing styles and even different camera systems.
Best For:
Fine art photography, street photography, documentary work
⭐⭐⭐⭐⭐ (4.7/5)
Premium
🌿
Peter McKinnon Presets
Created by the popular YouTuber and photographer, these presets focus on cinematic, moody aesthetics perfect for adventure and lifestyle photography.
Best For:
Adventure photography, cinematic portraits, travel photography
⭐⭐⭐⭐ (4.5/5)
Mid-range
💕
Tribe Archipelago
Known for their bright, airy aesthetic, Tribe Archipelago presets are favorites among wedding and portrait photographers seeking that dreamy, romantic look.
Best For:
Wedding photography, family portraits, bright lifestyle shots
⭐⭐⭐⭐⭐ (4.9/5)
Premium
💰 Investment Value of Professional Presets
Time Savings
Professional presets can save hours of editing time per session. For working photographers, this time savings often pays for the preset cost within the first few uses.
Learning Opportunity
Studying how professional presets are constructed can accelerate your learning curve and inspire your own creative development.
🛒 What to Look for When Buying Presets
Quality Indicators
- Before/after examples
- Multiple image types shown
- Professional photographer credentials
- Positive user reviews
Value Factors
- Number of presets included
- Installation instructions
- Video tutorials included
- Money-back guarantee
User Testimonials
"VSCO presets completely transformed my wedding photography workflow. The film emulations give my images that timeless quality clients love, and I can process an entire wedding in half the time."
— Sarah M., Wedding Photographer
"As a beginner, preset packs were invaluable for learning. I could see exactly what adjustments created different looks and gradually developed my own style based on what I learned."
— Mike R., Hobbyist Photographer
⚠️ Common Mistakes to Avoid When Using Presets
While presets are powerful tools, they're often misused by photographers who treat them as magic bullets rather than starting points. Understanding these common pitfalls will help you use presets more effectively and develop better editing skills overall.
🚫 Mistake #1: Applying Presets Without Basic Corrections
Many photographers apply presets to poorly exposed or incorrectly white-balanced images, expecting the preset to fix fundamental problems. This rarely works and often makes images look worse.
✅ Solution:
Always correct basic exposure, white balance, and lens distortions before applying any preset. Think of presets as the final creative touch, not the foundation of your edit.
🎭 Mistake #2: Over-Processing and Preset Stacking
The temptation to apply multiple presets or push adjustments to extreme levels often results in unnatural-looking images that scream "over-edited."
✅ Solution:
Less is often more. If a preset looks too strong, reduce its opacity or selectively adjust individual parameters. Aim for enhancements that feel natural and support your image rather than dominate it.
🎯 Mistake #3: Using Inappropriate Presets for Image Type
Applying a moody landscape preset to a bright portrait, or using a film emulation preset on a modern architectural shot can create jarring, inappropriate results.
✅ Solution:
Match presets to your subject matter and intended mood. Build a library of presets organized by category (portraits, landscapes, etc.) and choose appropriately for each image.
🔄 Mistake #4: Not Adjusting Presets for Individual Images
Treating presets as one-size-fits-all solutions without making image-specific adjustments leads to inconsistent results and missed opportunities for optimization.
✅ Solution:
Always fine-tune presets for each image. Adjust exposure, highlights, shadows, and colors as needed. The preset provides the starting point; your adjustments create the final masterpiece.
📱 Mistake #5: Ignoring Monitor Calibration
Editing on uncalibrated monitors can lead to images that look great on your screen but terrible when viewed elsewhere or printed.
✅ Solution:
Invest in monitor calibration or at least check your images on multiple devices. What looks perfect on an overly bright laptop screen might be too dark on properly calibrated displays.
🎯 Best Practices Summary
Before Applying Presets:
- Correct basic exposure
- Set proper white balance
- Apply lens corrections
- Crop and straighten if needed
After Applying Presets:
- Fine-tune for the specific image
- Check on multiple devices
- Make local adjustments as needed
- Save your own variations
🎉 Conclusion
Lightroom presets are transformative tools that can elevate your photography from good to extraordinary. Throughout this comprehensive guide, we've explored how presets work, their numerous benefits, different types available, and most importantly, how to use them effectively to develop your unique photographic style.
🔑 Key Takeaways
Technical Mastery
- Presets are starting points, not final destinations
- Always correct basic exposure before applying presets
- Fine-tune each preset for individual images
- Organize your presets for efficient workflow
Creative Development
- Use presets to learn advanced editing techniques
- Create custom presets to develop your signature style
- Match presets to your subject matter and mood
- Invest in quality preset packs for inspiration
Remember that the most successful photographers use presets as collaborative tools in their creative process. They understand that presets provide consistency and efficiency, but the real artistry comes from the personal touches and refinements made to each individual image. Whether you're using professionally created presets or developing your own, the goal should always be to enhance your unique vision rather than replace it.
The journey of mastering Lightroom presets is ongoing. As you experiment with different styles, create your own presets, and refine your editing workflow, you'll develop an intuitive understanding of how different adjustments affect your images. This knowledge will make you not just a better editor, but a more thoughtful photographer who considers the final image during the capture process.
🚀 Your Next Steps
Experiment: Try different preset styles on your existing images to see what resonates with your vision.
Practice: Apply the techniques learned in this guide to develop your own editing workflow.
Create: Start building your own preset collection based on your unique photographic style.
Share: Connect with other photographers to exchange ideas and preset recommendations.
The world of photography is constantly evolving, and presets will continue to play a crucial role in helping photographers achieve their creative visions efficiently and consistently. By understanding the principles outlined in this guide and continuing to experiment and learn, you'll be well-equipped to harness the full power of Lightroom presets in your photographic journey.
Ready to Transform Your Photography?
Start experimenting with presets today and discover the creative possibilities they unlock for your work.


