A comprehensive guide to help you start your streaming journey and build an engaging Twitch channel from your PC
- 1. Introduction
- 2. Understanding the Basics of Streaming
- 3. Setting Up Your Twitch Account
- 4. Choosing the Right Streaming Software
- 5. Configuring Your Streaming Software
- 6. Enhancing Your Stream with Overlays and Alerts
- 7. Testing Your Stream Before Going Live
- 8. Going Live on Twitch
- 9. Promoting Your Stream
- 10. Post-Stream Activities
- 11. Conclusion
1. Introduction
Twitch has revolutionized the world of live streaming, transforming from a gaming-focused platform into a diverse ecosystem where millions of creators share their passions with global audiences. With over 140 million monthly active users and billions of hours watched annually, Twitch has become the go-to destination for live entertainment, gaming, creative content, and community building.
Whether you're an aspiring gamer looking to share your gameplay, a creative individual wanting to showcase your artistic process, or someone with unique knowledge to share, streaming on Twitch offers an incredible opportunity to connect with like-minded individuals and potentially build a thriving community around your content.
The purpose of this comprehensive guide is to walk you through every step of the streaming process, from setting up your first Twitch account to going live with professional-quality streams. We'll cover everything you need to know about hardware requirements, software configuration, stream optimization, and audience engagement strategies that will help you succeed on the platform.
2. Understanding the Basics of Streaming
What is Streaming and How Does it Work?
Live streaming is the process of broadcasting real-time video and audio content over the internet. When you stream on Twitch, your computer captures video from your screen, webcam, and audio from your microphone, then encodes this data and sends it to Twitch's servers, which distribute it to your viewers worldwide.
The Critical Importance of Internet Connection
Upload Speed Requirements
- 720p streaming: 3-5 Mbps
- 1080p streaming: 5-8 Mbps
- Buffer for other activities: +2 Mbps
Connection Stability
- Wired connection preferred
- Consistent speeds matter more than peak speeds
- Low latency for real-time interaction
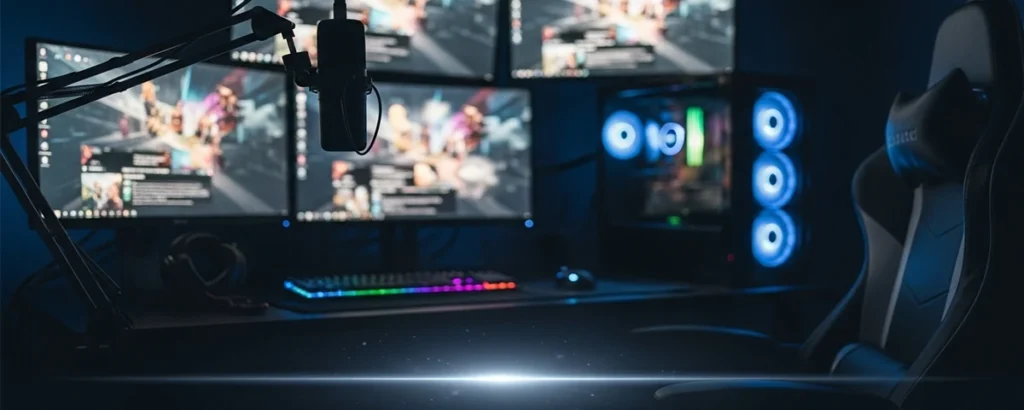
Hardware and Software Requirements
Minimum Hardware Requirements
CPU:
Intel i5-4590 / AMD FX 8350 or better
RAM:
8GB minimum, 16GB recommended
GPU:
Dedicated graphics card recommended
Storage:
SSD for better performance
Essential Peripherals
- Microphone: Clear audio is crucial - consider USB microphones like Blue Yeti or Audio-Technica ATR2100x
- Webcam: Logitech C920 or C922 are popular choices for 1080p streaming
- Lighting: Ring lights or softbox lighting for better video quality
- Headphones: Monitor your audio output and communicate with viewers
3. Setting Up Your Twitch Account
Step-by-Step Account Creation
1. Visit Twitch.tv and Sign Up
Navigate to Twitch.tv and click the "Sign Up" button. You can create an account using your email address or connect through existing social media accounts.
2. Choose Your Username Wisely
Select a memorable, brandable username that reflects your content or personality. This will be your channel URL, so choose something you'll be happy with long-term.
3. Verify Your Account
Complete email verification and consider adding phone verification for additional security and access to certain features.
Optimizing Your Profile
Profile Essentials
- Professional profile picture
- Compelling channel banner
- Clear, engaging bio
- Social media links
Channel Settings
- Set your primary game/category
- Configure chat settings
- Set up channel panels
- Enable follower notifications
4. Choosing the Right Streaming Software
Selecting the right streaming software is crucial for your success. Here's a comprehensive comparison of the most popular options:
OBS Studio
FREE
Pros:
- Completely free and open-source
- Highly customizable
- Excellent performance
- Large community support
- Regular updates
Cons:
- Steeper learning curve
- Requires manual setup
- No built-in alerts
Streamlabs OBS
FREEMIUM
Pros:
- User-friendly interface
- Built-in overlays and alerts
- Easy setup wizard
- Integrated chat
- Cloud backup
Cons:
- Higher resource usage
- Premium features cost extra
- Less customizable
XSplit
PAID
Pros:
- Professional features
- Excellent customer support
- Advanced audio mixing
- Built-in editing tools
Cons:
- Subscription-based pricing
- Resource intensive
- Limited free version
Installing OBS Studio (Recommended for Beginners)
1. Download OBS Studio from the official website (obsproject.com)
2. Run the installer and follow the setup wizard
3. Launch OBS and run the Auto-Configuration Wizard for optimal settings
5. Configuring Your Streaming Software
Proper configuration is essential for professional-quality streams. Here's a detailed guide for setting up OBS Studio:
Setting Up Scenes and Sources
Understanding Scenes
Scenes are different layouts for your stream. You might have separate scenes for:
- "Starting Soon" screen
- Main gameplay scene
- "Be Right Back" screen
- End screen with social media
Common Source Types
Display Capture:
Captures your entire screen
Video Capture Device:
For webcams and capture cards
Game Capture:
Captures specific games efficiently
Audio Input/Output:
Microphone and desktop audio
Video and Audio Settings
Video Settings
Base Resolution:
Match your monitor (1920x1080)
Output Resolution:
720p for beginners, 1080p for better hardware
FPS:
30 FPS (stable) or 60 FPS (smooth)
Audio Settings
Sample Rate:
44.1 kHz or 48 kHz
Channels:
Stereo for most content
Desktop Audio:
Set to your main audio device
Stream Settings and Optimization
Bitrate, Resolution, and Frame Rate Guidelines
| Resolution | Frame Rate | Bitrate Range | Best For |
|---|---|---|---|
| 720p (1280x720) | 30 FPS | 2500-4000 kbps | New streamers, slower internet |
| 720p (1280x720) | 60 FPS | 3500-5000 kbps | Fast-paced games |
| 1080p (1920x1080) | 30 FPS | 4500-6000 kbps | High-quality content |
| 1080p (1920x1080) | 60 FPS | 6000-8000 kbps | Partners/Affiliates only |
6. Enhancing Your Stream with Overlays and Alerts
Overlays and alerts are essential for creating an engaging, professional-looking stream that keeps viewers interested and informed about your channel activity.
The Importance of Visual Elements
Overlays Provide:
- Brand consistency and recognition
- Important information display
- Professional appearance
- Viewer engagement tools
- Social media integration
Alerts Enhance:
- Real-time viewer interaction
- Community building
- Follower appreciation
- Donation acknowledgment
- Subscription celebrations
Tools for Creating Custom Overlays
Popular Design Tools
Canva
User-friendly, templates available
Streamlabs
Built-in overlay creator
Photoshop
Professional design tool
Adding Overlays and Alerts to OBS
1. Create or Download Overlays
Design your overlay using tools like Canva or download free overlays from sites like Streamlabs or OWN3D.
2. Add Image Source in OBS
In your scene, click the "+" button, select "Image," and browse to your overlay file.
3. Position and Resize
Drag and resize the overlay to fit your stream layout perfectly.
4. Set Up Alerts
Use Streamlabs or StreamElements to create browser source alerts, then add the URL as a Browser Source in OBS.
7. Testing Your Stream Before Going Live
Testing is crucial to ensure your stream runs smoothly and provides the best experience for your viewers. Never skip this step!
Why Testing Matters
First impressions matter on Twitch. Technical issues during your first streams can drive away potential followers. Testing helps you identify and fix problems before they affect your audience.
How to Conduct Test Streams
1. Use Twitch's Inspector Tool
Visit inspector.twitch.tv while streaming to monitor your stream health, dropped frames, and bitrate stability.
2. Record Locally
Use OBS's recording feature to save a local copy and review video/audio quality without going live.
3. Test with Friends
Ask friends to watch your test stream and provide feedback on audio levels, video quality, and overall experience.
Pre-Stream Testing Checklist
Audio Checklist
- Microphone levels (-12dB to -6dB)
- Desktop audio balance
- No background noise
- Audio sync with video
Video Checklist
- Clear, sharp image quality
- Proper lighting on webcam
- Overlays positioned correctly
- No dropped frames
8. Going Live on Twitch
You've done all the preparation – now it's time to go live! Here's how to start your stream and optimize it for discovery.
Starting Your Stream in OBS
1. Connect to Twitch
In OBS, go to Settings > Stream, select Twitch as your service, and enter your stream key from your Twitch dashboard.
2. Final Check
Ensure your scenes are set up correctly, audio levels are good, and all sources are working properly.
3. Click "Start Streaming"
Hit the "Start Streaming" button in OBS. You should see the button turn red and your stream will begin broadcasting.
Optimizing for Discoverability
Stream Title Best Practices
- Be descriptive and specific
- Include relevant keywords
- Mention your skill level
- Add personality or humor
- Keep it under 140 characters
Tags and Categories
- Choose the correct game category
- Use relevant tags (max 10)
- Include language tags
- Add skill level tags
- Use community-specific tags
Engaging with Viewers
Essential Engagement Tips
Chat Interaction
- Read chat messages aloud
- Thank new followers immediately
- Ask questions to encourage participation
- Respond to every message when possible
Content Strategy
- Explain what you're doing
- Share your thought process
- Tell stories and be personable
- Keep talking even when alone
9. Promoting Your Stream
Building an audience on Twitch requires active promotion and community engagement beyond just streaming. Here are proven strategies to grow your channel.
Social Media Strategies
Twitter/X
- Share stream schedules
- Post gaming clips and highlights
- Engage with gaming communities
- Use relevant hashtags
- Network with other streamers
- Behind-the-scenes content
- Setup photos and videos
- Stories with stream updates
- IGTV for longer highlights
- Reels for viral content
YouTube
- Upload stream highlights
- Create tutorial videos
- Gaming guides and tips
- Stream announcements
- Collaborate with other creators
Networking and Community Building
Building Relationships with Other Streamers
- Raid and Host: Support other streamers by raiding their channels at the end of your streams
- Collaborate: Play games together, create content partnerships, and cross-promote
- Join Communities: Participate in Discord servers and streaming communities
- Attend Events: Join gaming conventions, meetups, and online events
Content Creation for Growth
Engaging Content Ideas
Interactive Content
- Viewer game suggestions
- Q&A sessions
- Community challenges
- Polls and voting
Special Events
- Milestone celebrations
- Themed stream days
- Charity fundraisers
- Tournament participation
10. Post-Stream Activities
What you do after your stream ends is just as important as the stream itself. Post-stream activities help you improve, engage with your community, and prepare for future success.
Analyzing Stream Performance
Key Metrics to Review
- Average viewer count
- Peak concurrent viewers
- New followers gained
- Chat engagement rate
- Stream duration and consistency
Where to Find Analytics
- Twitch Creator Dashboard
- StreamLabs analytics
- Third-party tools (TwitchTracker)
- OBS recording statistics
- Social media insights
Community Engagement
Staying Connected Between Streams
- Discord Community: Create and maintain an active Discord server for your viewers
- Social Media Updates: Share updates, behind-the-scenes content, and interact with followers
- Thank You Messages: Personally thank new followers and subscribers
- Content Planning: Ask your community what they'd like to see in future streams
Continuous Improvement
Areas for Regular Assessment
1. Technical Quality
Review audio levels, video quality, and stream stability. Make adjustments based on viewer feedback.
2. Content Strategy
Analyze which games, topics, or activities generated the most engagement and plan accordingly.
3. Schedule Optimization
Identify your peak viewer times and adjust your streaming schedule to maximize audience reach.
11. Conclusion
Congratulations! You now have all the knowledge needed to start your Twitch streaming journey from your PC. From understanding the technical requirements to building an engaged community, this comprehensive guide has covered every essential aspect of successful streaming.
Key Takeaways
- Technical Foundation: Ensure you have stable internet, proper hardware, and optimized software settings
- Content Quality: Focus on engaging, authentic content that reflects your personality and interests
- Community Building: Actively engage with viewers, network with other streamers, and maintain consistent communication
- Continuous Learning: Regularly analyze your performance and adapt your strategy based on data and feedback
- Patience and Persistence: Building a successful stream takes time, consistency, and dedication
Remember, every successful streamer started exactly where you are now. The most important step is to begin. Start streaming, learn from each broadcast, and don't be afraid to experiment with different content and approaches.


