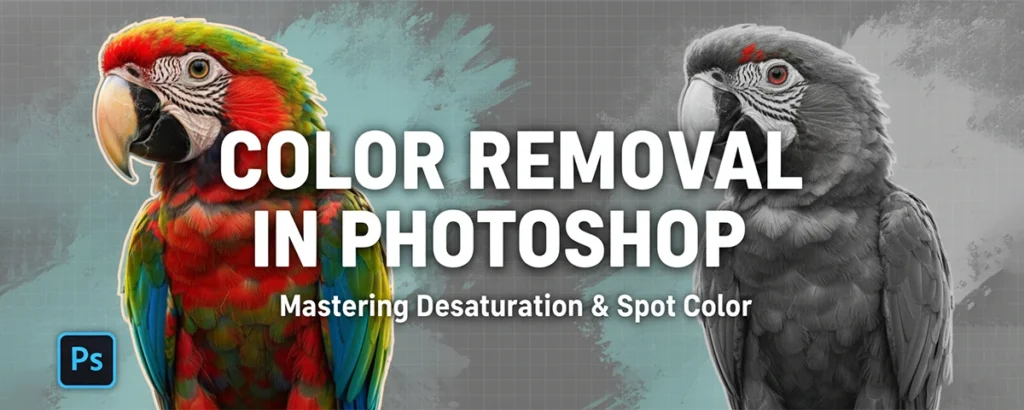
Dive into this fun, step-by-step guide to turning vibrant photos into stunning black-and-white masterpieces. Whether you're a newbie or a pro, let's make your images pop!
Table of contents
- Introduction: Why Go Black and White?
- What You'll Need to Get Started
- Why Bother Removing Color Anyway?
- Quick and Easy Ways to Remove Color
- Pro-Level Techniques: Black & White Adjustment
- Selective Color Removal for Wow Effects
- Advanced Channel-Based Color Removal
- Creative Effects: Duotone and Split Toning
- Batch Processing Multiple Images
- Keyboard Shortcuts to Speed Up Your Workflow
- Before and After: See the Magic Happen
- Tips to Make Your Edits Shine
- Common Hiccups and How to Fix Them
- Alternatives to Photoshop
- FAQs
- Resources and Further Reading
- What Others Are Saying
- Wrapping It Up
Introduction: Why Go Black and White?
Hey, have you ever looked at a colorful photo and thought, 'This would look amazing in black and white'? You're not alone! Removing color can add drama, focus, and timeless appeal to your images. As someone who's played with Photoshop for years, I can tell you it's like giving your photos a fresh haircut – they just look sharper and more sophisticated.
Imagine capturing a sunset, but instead of the usual oranges and pinks, you strip it down to pure light and shadow. Or a portrait where the subject's eyes really stand out without color distractions. That's the magic of desaturation!

In this guide, we'll cover everything from quick tricks to pro-level techniques. You'll learn how to use adjustment layers, channels, and even selective color removal. Plus, I'll share tips to avoid common mistakes and make your edits look professional.
What You'll Need to Get Started
Before we jump in, let's make sure you have the right tools. Don't worry, you don't need fancy equipment – just Photoshop and a willingness to experiment!
- Adobe Photoshop: The star of the show. Any recent version will do.
- A Computer: Mac or PC, doesn't matter.
- Some Images: Grab photos from your camera or stock sites to practice on.
- Curiosity: The most important tool – be ready to try things out!
If you don't have Photoshop, check out free alternatives like GIMP later in this guide.
Why Bother Removing Color Anyway?
Great question! Color is fun, but sometimes it's just too much. Here's why going monochrome can be a game-changer:
1. Artistic Vibes
Black and white has been an art form for ages. It lets you focus on shapes, textures, and emotions. Think of it as stripping away the noise to reveal the soul of your image.
2. Draw Attention
Without color, viewers zero in on the important stuff. Perfect for portraits or product shots where you want people to notice the details.
3. Tech Reasons
Some prints or websites need grayscale. Plus, B&W images often load faster online.
4. Cool Effects
Selective color removal? Mind-blowing! Keep one flower red in a gray field – instant wow factor.
5. Feel the Feels
Monochrome can make emotions hit harder. A black-and-white smile feels more genuine, a landscape more epic.
Whatever your reason, Photoshop makes it easy. Let's get to the how-to!
Quick and Easy Ways to Remove Color
Method 1: The Super Simple Desaturate
Want to go gray in seconds? This is your go-to.
- Open your photo in Photoshop.
- Hit Ctrl+A to select all.
- Go to Image > Adjustments > Desaturate (or Shift+Ctrl+U).
- Boom! Instant grayscale.

It's fast, but not super customizable. Great for quick edits.
Method 2: Go Full Grayscale Mode
For a permanent change, switch the image mode.
- Open your image.
- Image > Mode > Grayscale.
- Choose to discard color info.
Method 3: Hue/Saturation for Control
Drag saturation to -100 for adjustable desaturation.
- Layer > New Adjustment Layer > Hue/Saturation.
- Slide Saturation to -100.
Pro-Level Techniques: Black & White Adjustment
This is where the magic happens. Fine-tune your grayscale with sliders for each color.
How to Do It
- Layer > New Adjustment Layer > Black & White.
- Adjust Reds, Yellows, etc., to control conversion.
- Use presets or Targeted Adjustment Tool for precision.

Non-destructive and powerful – your new best friend!
Selective Color Removal for Wow Effects
Keep some color while graying the rest. Use layer masks to paint in color or grayscale.
With Layer Masks
- Add Black & White adjustment layer.
- Mask with black brush to reveal color.

Advanced Channel-Based Color Removal
For precise control, dive into channels. This method analyzes color data to create custom grayscale conversions.
How to Use Channels
- Open Channels panel (Window > Channels).
- Duplicate a channel (e.g., Red) by dragging to New Channel icon.
- Image > Apply Image to blend channels for custom grayscale.
- Adjust opacity and blending modes for fine-tuning.
This technique is great for images where standard desaturation doesn't give the desired contrast.
Creative Effects: Duotone and Split Toning
Once you've removed color, add creative flair with duotone or split toning for artistic monochrome images.
Duotone Effect
- Convert to grayscale.
- Image > Mode > Duotone.
- Choose two inks (e.g., black and sepia) and adjust curves.
Split Toning
Use Color Balance adjustment layers to add warm highlights and cool shadows.
- Add Color Balance layer.
- Adjust highlights and shadows separately.
These effects give your B&W images a unique, professional look.
Batch Processing Multiple Images
Saving time on multiple photos? Use Actions and Batch processing.
Create an Action
- Window > Actions.
- Record a new action with your desaturation steps.
Batch Process
- File > Automate > Batch.
- Select your action and source folder.
- Choose destination and run.
Perfect for photographers editing large sets of images.
Keyboard Shortcuts to Speed Up Your Workflow
Master these shortcuts to edit faster:
- Ctrl+Shift+U: Desaturate
- Ctrl+L: Levels
- Ctrl+M: Curves
- Ctrl+J: Duplicate layer
- Alt+Click layer mask: View mask
Learning shortcuts can cut your editing time in half!
Before and After: See the Magic Happen
Let's look at some real examples to inspire you.


Notice how the black-and-white version emphasizes the light and shadow? That's the power of desaturation!
Tips to Make Your Edits Shine
Work in RGB, use adjustment layers, adjust contrast, and practice on different images. For portraits, boost reds; for landscapes, tweak blues.
- Use Levels for contrast.
- Keyboard shortcuts save time.
- Duplicate layers to preserve originals.
Common Hiccups and How to Fix Them
Image Looks Flat?
Boost contrast with Levels or Curves. Add an S-curve for that pop!
Colors Look the Same in Gray?
Tweak the Black & White sliders to create distinction.
Too Much Noise?
Use Filter > Noise > Reduce Noise before desaturating.
Practice makes perfect – don't stress if it doesn't look right the first time!
Alternatives to Photoshop
Try Lightroom, GIMP, or online tools like Photopea for similar effects.
FAQs
Can I undo it? Yes, with adjustment layers.
Does it affect file size? Usually not much.
How to make B&W pop? Add contrast with Levels.
Add color back? Use masks.
Difference between desaturate and grayscale? Desaturate keeps RGB mode.
Image looks flat? Adjust contrast.
Automate for multiple images? Use Actions and Batch.
Resources and Further Reading
- Adobe Help Docs
- Books like 'Understanding Exposure'
- Online tutorials on Phlearn
- Communities on Reddit
- Study masters like Ansel Adams
Practice Exercises: Convert 5 photos, try selective removal, experiment with presets.
What Others Are Saying
"This guide turned me from a color-lover to a B&W enthusiast! My portraits now have so much more depth." - Sarah, Photographer
"Easy to follow, even for beginners. I love the tips on selective removal!" - Mike, Graphic Designer
Wrapping It Up
Wow, we've covered a lot! From basic desaturate to advanced masking, you now have the skills to create stunning monochrome images. Remember, it's not just about removing color – it's about enhancing the story your photo tells.
Go experiment! Try these techniques on your own photos and see what happens. Share your results in the comments – I'd love to see your work.
Happy editing, friends! If you need more help, check out the resources below or drop a question.

